App Help Pages
- Viewing Activities
- Search route database
- Settings
Home page
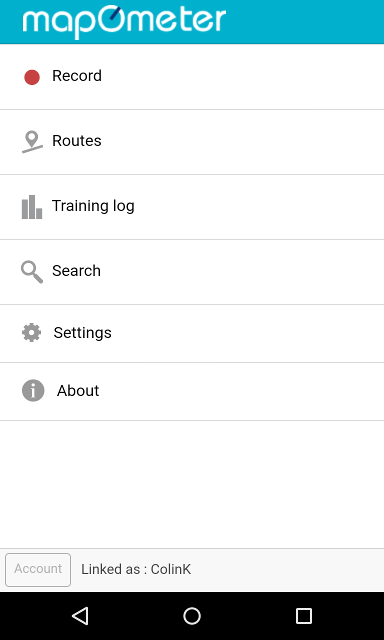
The home page of the mapometer app gives easy access to the main functions.
- Record
- Allows you to use GPS tracking to record your activities. These activities can then be stored to your routes or your training log.
- Routes
- Allows you view and manage your stored routes.
- Training log
- The training log allows you view and manage your logged activities. Activities may be recorded using the record feature or manually entered.
- Search
- This feature allows you to get inspiration for new routes by viewing routes recorded by other people. You can restrict the search to a given geographical area, route length and sport.
- Settings
- Modify your app settings. Including sections for maps settings, share settings, and sync settings.
- About
- App version and contact information
The app is intended primarily as an addition to the mapometer.com website. When you first install the app you will be prompted to link your app with your mapometer.com account. If you do not already have an account you can create a new one to use with the app. Once you have linked your app with an account, the linked account will be shown at the bottom of the home page.
Record page
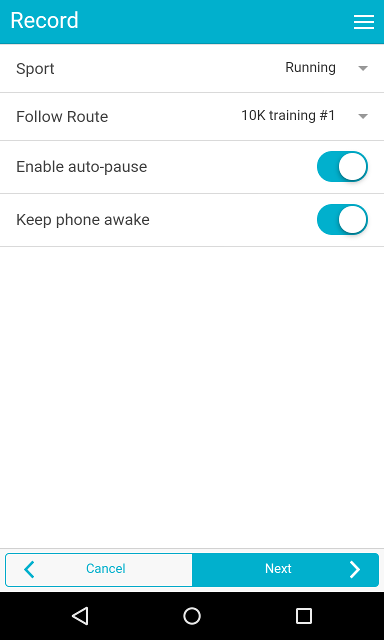
You can set the sport and the route to follow when using GPS to record a new route or activity.
The choice of sport will be recorded in the route or activity you save after completing recording. The choice of sport will also affect the value shown during tracking for the energy burned.
If you select a route to follow, this route will be shown on the map during tracking. This allows you to follow a route with which you may not be familiar. Although this route will be shown you need not follow it completely. You might use the route as a guide through a certain section of your activity but start and finish elsewhere.
If auto-pause is selected, recording will temporarily halt if you are stationary for more than a few seconds.
If keep screen awake is selected, the auto-sleep feature on your phone is disabled while recording. This is useful if you need to view the map to follow a route.
Tracking page
The tracking page is used to actually record new GPS routes and activities. When the page first loads, you will see a dialog - "Acquiring GPS lock". This will disappear once GPS data is of sufficient accuracy. After this point you can start recording.
The page has two main tabs allowing you to view either the map or the summary data as you complete your route. You can flip between these two views at any point while tracking.
Map tab
The map tab shows the route you're following (if you selected one). It also shows your current position (blue dot) and the track the recorded route so far. The colors and styles of the follow route and tracking route can be changes via the map settings.
The map view may be tilted by a two finger downward swipe. It can be put back to a perpendicular view by a two finger upward swipe. When in a tilted view, the orientation of the map will change to match your current direction of travel (like a satnav). When in perpendicular view, the map maintains a standard north-south orientation.
The map icon on the top right of the map allows you to change the type of map used. Options are: road map; satellite; hybrid; terrain; OSM (Open Street Map); offline (cached OSM map tiles available without a network connection).
Stats tab
The stats tab allows you to view summary statistics for you route during tracking. This may be useful if you want to keep track of you pace or energy use while tracking. To make then more easily readable while on-the-move, clicking on one statistic will make that statistic larger. A second click toggles it back to small.
Footer control buttons
At the bottom of the page are the main control buttons for tracking. Once your device has a GPS fix the start button will be enabled. At any point after this you can hit the start button to begin storing data points on the track. Before recording starts you may simply cancel the tracking.
Once started, you may pause / resume recording at any point. While paused no data points will be added and the timer is paused.
Once you’ve finished you activity, hit the finish button to stop recording. At this point you may still view the map and summary data. You now have a choice of saving the data you have logged or to discard it. Choosing "save" takes you to the save page where you can enter details for the route and chose how it will be stored.
Auto-pause
If auto-pause was enabled, recording will automatically pause if you are stationary for more than a few seconds. When auto-pause activates, a pop-up appears and the device will beep periodically. Clicking the 'OK' button on the pop-up will stop the beeping and put the device into normal pause mode (clicking resume will then start recording again). If you start moving again while in auto-pause, recording will resume automatically.
Save page
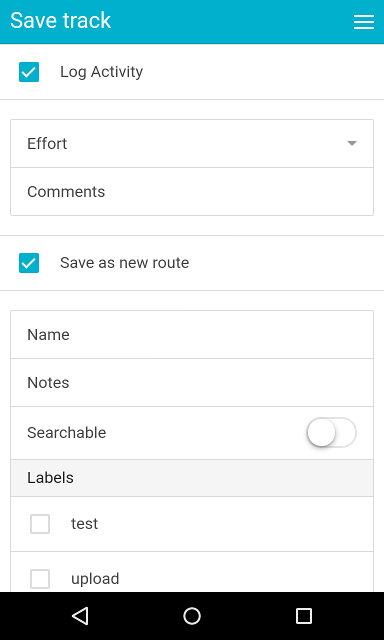
After tracking you have a choice about how the data will be saved. You can save the data as a new route or as an activity or both.
An activity is a record of a particular training session, including duration and speed information. Saved activities are shown in the training log
A route describes the elements of the track that would be independent of any particular session. The same route can be followed during multiple activities. A route includes the path and elevation, but not pace information (as this would vary each time you follow this route). Saved routes are shown in the route list.
If saving as an activity you may optionally enter the subjective effort level of your activity as well as any comments you wish to save with the activity.
If saving as an route you must give the route a name. You may, optionally, make the route available for other to view via the search feature. You make also set labels for the route. These labels allow for filtering the route list and make if easier to find particular routes within your route list.
Routes page
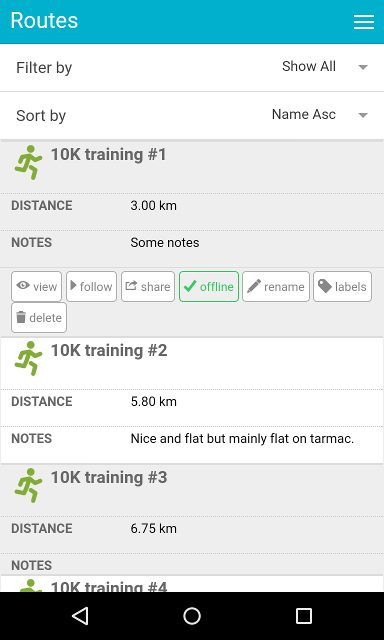
The routes page displays a table of your stored routes. If the screen isn't sufficiently wide to show the route information in table view the data will be shown in a stacked-view instead.
Routes may be sorted by either sport, distance or name. In table-view, this is done by clicking on the column header for that column. Subsequent clicks on the same column header will toggle the sort order. A small up or down arrow is displayed to show the current sorting column and order. In stacked-view, a sort-by pull-down selector is provided. Rather than always displaying all routes, you may filter the routes and only show those marked with a selected tag.
Each row / block displays summary information about a single route. Tapping on a route shows the actions that can be performed on that route. The available actions are: view; follow; share; offline; rename; labels; delete.
View: tapping this takes you to the detailed map view of this route.
Follow: if tap follow you'll be taken to the record page with this route pre-selected as the one to follow.
Share: share this route via social media, email or other installed app registered for sharing.
Offline: this caches the OSM map tiles require to display this route even if your device is offline. Map tiles are cached up-to the maximum offline caching level in your settings. if this button is shown in green (with a tick icon) it means that this route has already been cached for offline use.
Rename: self explanatory - rename the currently selected route.
Labels: lets you set / unset labels for this route.
Delete: permanently delete this route (you'll be warned and have to confirm before deleting)
Route page
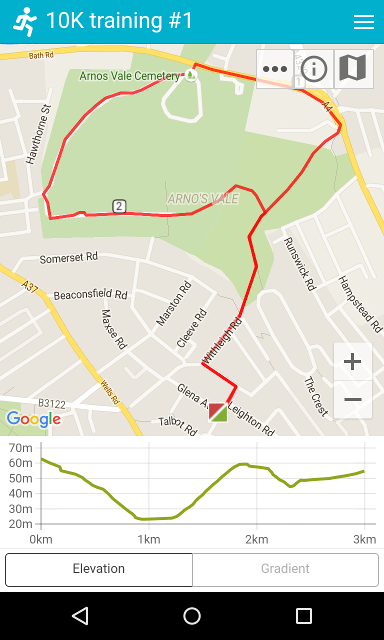
The route page shows the map of the route's path and the elevation and gradient graphs (if elevation data was saved with the route).
On the map
This tab show the actual path of the route including the start-point end-point and intermediate distance markers. The map can be manipulated with the usual Google maps gestures:
- Zoom in: double click; pinch-in
- Zoom out: pinch-out
- Rotate: two finger touch and rotate
- Tilt-down: two finger downward swipe
- Tilt-up: two finger upward swipe
There are 3 additional controls on the top right of the map, these are (from left to right): actions; information; map type.
Actions: with actions you can follow, share, offline or delete the currently viewed route. (see the routes page help section for a description of these actions).
Information: this listed the summary stats for the route. This includes the distance; energy burned (for someone of your weight); total ascent and descent (if elevation data was saved with the route); and any notes that were saved with the route.
Map type: This allows you to switch between the standard Google Maps map types (road map, satellite, hybrid, terrain) as well as OSM (Open Street Map) and Offline. Offline is a view showing all cached tiles from all offline routes. Only areas covered by routes you have made available offline will have map tiles and these may not be available at all zoom levels.
Graph Tabs
If elevation information was saved in the GPX file for this route then this data is graphed on this tab. The units used for the graph are either imperial or SI depending on the distance units in which this route was saved. The elevation data may be displayed as either an elevation profile or a gradient graph.
Training log page
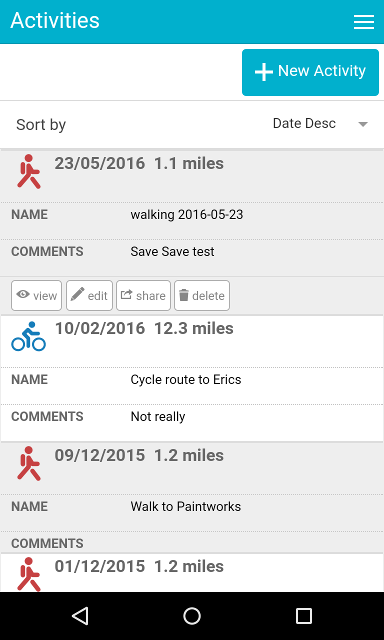
The training log page shows a table of recent training activities. The table shows the sport, date distance and name of each activity (in portrait mode on narrower screens the data may be stacked rather than tabulated).
Tapping on a column header cause the list to be sorted according to that columns values. A second tap on the same heading reverses the direction of the sorting. Devices showing a stacked view have a sort by selector above the activity list.
Activities are normally added by tracking and saving activities via GPS. Activities may also be manually added to the list using the 'New Activity' button. This allows basic information to be set for an activity, but no mapping or other GPX data. This is intended for activities that were not tracked with the app (or those that could not be, e.g. swimming, treadmill runs).
Each row / block displays summary information about a single activity. Tapping on an activity shows the actions that can be performed on that activity. The available actions are: view; edit; share; delete.
View: tapping this takes you to the detailed map view of this route.
Edit: manually edit the information for this activity (but not its GPS data).
Share: share this activity via social media, email or other installed app registered for sharing.
Delete: permanently delete this activity (you'll be warned and have to confirm before deleting)
Activity page
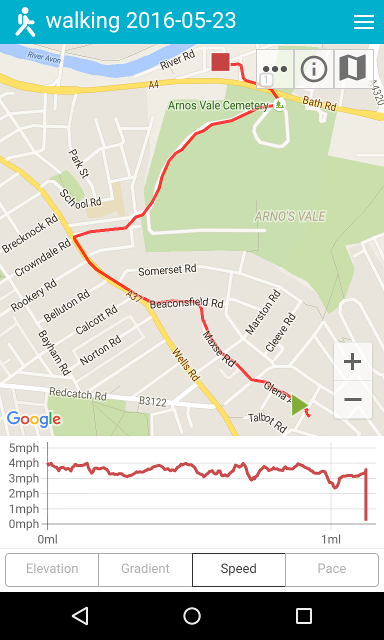
The activity page gives the details of a single activity. Depending on how the activity was generated, this may include summary information, a map of the path followed during the activity and graphs of elevation, gradient, speed and pace.
On the map
The map show the actual path of the activity including the start-point end-point and intermediate distance markers. The map can be manipulated with the usual Google maps gestures:
- Zoom in: double click; pinch-in
- Zoom out: pinch-out
- Rotate: two finger touch and rotate
- Tilt-down: two finger downward swipe
- Tilt-up: two finger upward swipe
There are 3 additional controls on the top right of the map, these are (from left to right): actions; information; map type.
Actions: with actions you can edit, share, or delete the currently viewed route. (see the training_log help section for a description of these actions).
Information: this listed the summary stats for the activity. This includes:
- duration of the activity
- distance of the route
- average pace and speed
- total energy used (based on your weight from the app settings)
- cumulative ascent and descent
- any comments you made when entering the activity
Map type: This allows you to switch between the standard Google Maps map types (road map, satellite, hybrid, terrain) as well as OSM (Open Street Map) and Offline. Offline is a view showing all cached tiles from all offline routes. Only areas covered by routes you have made available offline will have map tiles and these may not be available at all zoom levels.
Graph Tabs
If elevation or timing information was saved in the GPX file for this route then this data is graphed on this tabs. The units used for the graph are either imperial or SI depending on the distance units in which this activity was saved. The elevation data may be displayed as either an elevation profile or a gradient graph. Timing data may be displayed as either a speed or a pace graph. Pace is the inverse of speed and is often used by runners (e.g. 8 mins/mile). Since pace can approach infinity when stationary (e.g. waiting to cross a road), high values of pace are cropped from the graph.
Add activity page
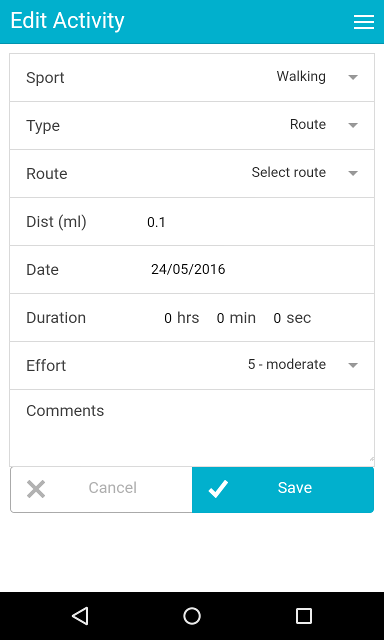
This page allows you to manually enter activity details for a new activity or edit the details of an existing activity. Currently, any GPX data associated with an activity cannot be edited.
Selecting the sport for the activity will affected how the energy is calculated
If you are manually entering an activity in which you followed one of your saved routes, you can select the route and the route's distance will be entered for you as the distance of the activity and the routes map will be shown as the activities map.
Search Location
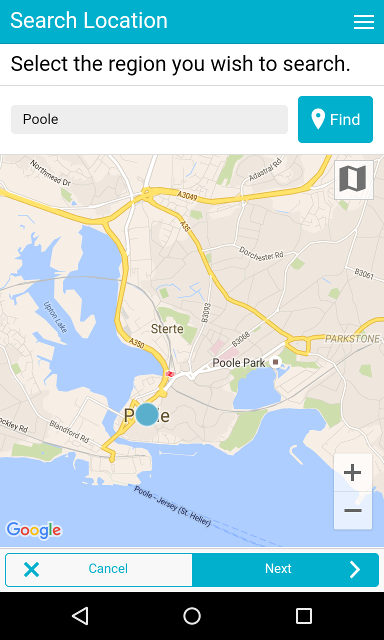
This page is the first step in the search process. It sets the area within which you wish to search for routes.
If geolocation is available, the location should default to your current position. This can be changed by entering a location into the input box and tapping 'Find'. The location can also be changed by manipulating the map directly (drag, zoom, etc.).
Once the map shows the area you wish to search tap 'Next'.
For performance reasons, there is a limit on how large an area may be searched. If you exceed this limit, you will see a warning asking to you to zoom in further.
Search settings page
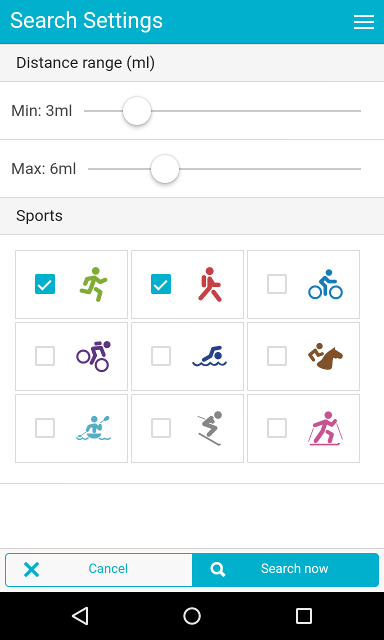
This page allows you to specify what kind of routes to search for within your previously selected search area.
You can set a distance range for the routes. This will be in the units from your general settings.
You can also restrict the search to certain sports.
Tap the search button to view the results of your search.
Search results page

The header bar shows the number of search results and the position of the currently view route within the result set.
The sub header gives the sport and distance of the currently displayed route. The left and right arrows on this bar allow you to browse back and forth through the set of search results.
On the map
Each route's path is initially shown within the context of the origin search area, but can be zoomed-in/out with the standard map controls.
There are 3 additional controls on the top right of the map, these are (from left to right): actions; information; map type.
Actions: with actions you can follow, copy or offline the currently viewed route. Tapping the follow button will display this route while recording a new track. Copy will allow you to save a copy of this route into your routes list. Offline caches the OSM tiles needed to display this route while your device is offline.
Information: this listed the summary stats for the route. This includes the distance; energy burned (for someone of your weight); total ascent and descent (if elevation data was saved with the route); and any notes that were saved with the route.
Map type: This allows you to switch between the standard Google Maps map types (road map, satellite, hybrid, terrain) as well as OSM (Open Street Map) and Offline. Offline is a view showing all cached tiles from all offline routes. Only areas covered by routes you have made available offline will have map tiles and these may not be available at all zoom levels.
Graph Tabs
If elevation information was saved in the GPX file for this route then this data is graphed on this tab. The units used for the graph are either imperial or SI depending on the preferred distance units from your settings. The elevation data may be displayed as either an elevation profile or a gradient graph.
Settings - general tab
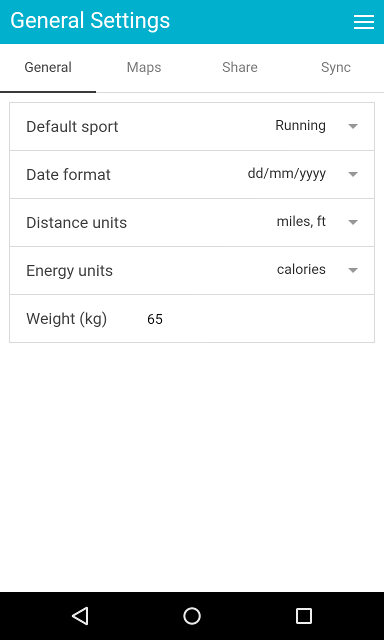
Date format: How you would like your dates displayed standard international format (dd/mm/yyyy) or US format (mm/dd/yyyy).
Default sport: This will be used as the default when tracking a new route or adding an activity. You may override this when adding a route or activity.
Distance units: The units you'd like distances displayed in imperial or metric. For imperial distances will be in miles and elevations in feet. For metric distances will be in km and elevations in meters.
Energy unit: Whether to display energy used in activities as calories or Joules.
Weight: This must be entered in kgs. It is used in energy calculations.
Settings - maps tab
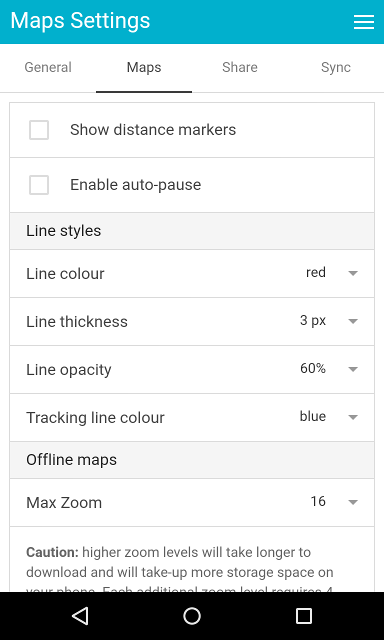
Show distance markers: whether to show distance markers along the path of routes/activities on maps
Enable auto-pause: whether GPS tracking should pause recording if you become stationary.
Line styles:The first 3 of these settings (Line colour, Line thickness, Line opacity) set the default line style for displaying routes on maps. When tracking an activity a different line colour is used. This is to distinguish it from the line for a saved route (or search route) which is being followed.
Offline maps: You can set your default max zoom level for offline maps. Higher values store maps at more detailed levels, but take longer to download and use more storage on your device. You can also clear any stored maps areas to free-up storage on your device.
Settings - share tab
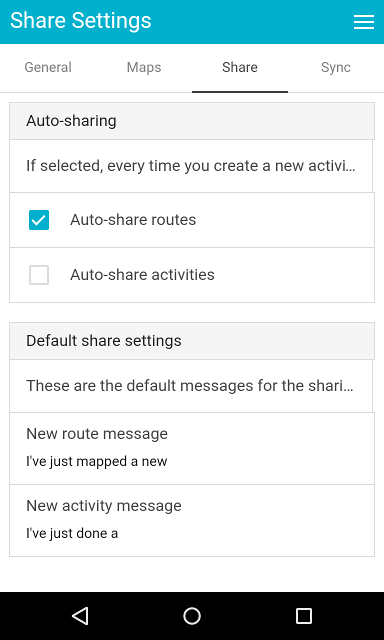
Auto-sharing
You may set the app to automatically open the share page after you create a new activity or route.
Default share settings
New activity message: The default message to use when sharing an activity (distance and sport are added automatically)
New route message: The default message to use when sharing a route (distance and sport are added automatically)
Settings - sync tab not-linked
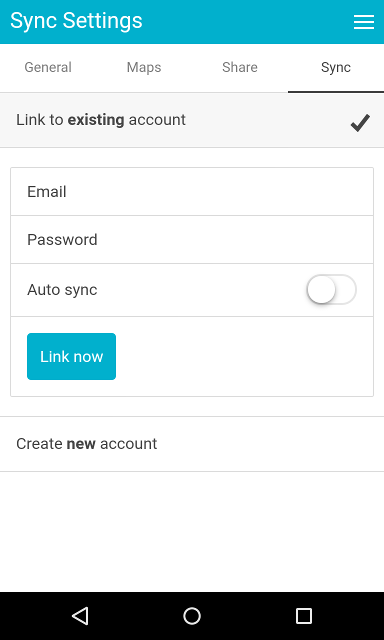
If you do not currently have a mapometer.com account linked to your app, you will be given the options to 'Link to existing>' or 'Create new account'
Link to existing: Enter your mapometer.com email login and password and whether you'd like this account to autosync. Clicking 'Link now' downloads your details and settings from mapometer.com and links your app with that account. If 'auto sync' was selected your activities and routes will also be downloaded. If 'manual sync' was selected you'll need to tab 'Sync now' to download your routes and activities.
Create new account: This option creates a new empty account on mapometer.com using the email and password you give as a login and setting the username you select for that account. Accounts at mapometer.com must have unique email addresses and usernames, so you may be prompted to try again if the ones you've selected are already in use.
Settings - sync tab linked
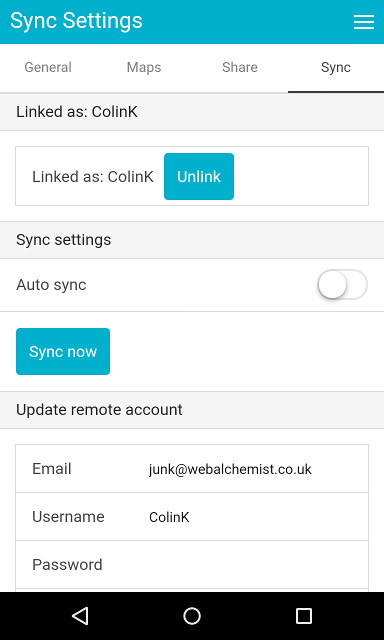
Linked as: This shows the username of the mapometer account to which the app is linked. Tapping the unlink button will unlink the app from its existing account (and remove any saved routes and activities).
Auto sync: If auto sync is selected the app will automatically sync with your mapometer.com account at start-up and whenever you save new routes or activities. If auto-sync is not selected, the app will only sync when tap the 'Sync now' button.
You may also update your access details for mapometer.com from within the app. You can change your login email, username and password. If the password fields are left blank the password will remain unchanged.